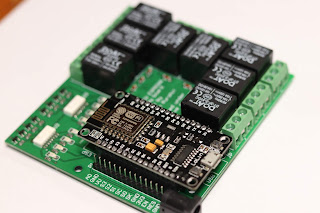
AstroEQ based open source telescope controller board
This is the second blog post about some DIY hardware I have made for controlling the telescope on equatorial mount based on AstroEQ platform, fully open source hardware.
for more info about AstroEQ--- https://www.astroeq.co.uk/tutorials.php
See what is an equatorial mount-- https://en.wikipedia.org/wiki/Equatorial_mount
The board is fully an open source hardware based on ASCOM, EQMOD and AstroEQ, driven by powerful 8-bit microcontroller Atmega2560 (incorporated in Arduino boards). The board acts as shield for the Mega2560 boards available in the market and is capable of converting any equatorial mount telescope into a motorized telescope with both axis control and it will let you do through the PC or laptop... yay.. sounds interesting. Let us see what is required to do so.....
First of all you need a telescope mount which supports mounting motors on that (either single axis or double axis). Once you have telescope mount, you have to do some basic calculations for the gear ratios of the telescope mount.
DO NOT WORRY if you don't have access to mount the motors, you can make any design nowadays and 3D print it at very low cost.
To calculate gear ratios, you have to either disassemble the mount (at your own risk, which is worth taking) and count the gears or better option is to ask on internet if somebody had already done this job for you.
Once you get the gear ratios, note it down, this number is very important and you have to feed it in the utility which can be downloaded from AstroEQ official website. Practically that is it, you are good to go with this much information.
This is the calculation part. Now lets take a look at hardware required to do so.
Required Hardware for motorizing the telescope--
1. You need Arduino Mega2560 based board.
2. You need a good stepper motor which is capable of going at least 200 steps per revolution. (The motors available on bholanath stepper motors are really good, which I have bought and tested for my mount. you can buy it from-- https://www.steppermotors.bholanath.in/
3. Good stepper driver with nice microstepping, DRV 8825 (1/32 microstepping) or Pololu A4988 (1/16th microstepping). Remember, microsteping is the key in making the mount resolution better and making smooth movement. You can read more about the drivers on pololu website.
https://www.pololu.com/product/2133
https://www.pololu.com/product/1182
In my experience, DRV8825 is robust than A4988 and also good for high current handling, though both of them come in same PCB footprint.
4. The Board mentioned here in the blog.
5. Most important-- long lasting power supply. For the mount which I have made for my Bresser Galaxia 114/900 EQ telescope, I am using Lithium batteries extracted from E-waste. They work really good for me.
6. Laptop or a portable PC for controlling the mount.
7. Metal brackets or 3D printed parts as per your requirements
Here all we are talking about the hardware and the software which are are open source and can be downloaded from their respective websites.
Now since you have all the hardware, you are ready to go.
You need to install stellarium, stellariumscope and ASCOM drivers with EQMOD. Most importantly, you need to download AstroEQ from their website.
Configure the AstroEQ utility as mentioned on the website. If you have any doubts, post in as comment here or directly in the astroeq forum, active on the website.
Update 1---
You have to solder the pins on DRV8825 driver to make it work smoother than normal. This is what I have done for mine. Note that solder joint above the text 88 on the IC.
Since I have made extra PCBs, because of minimum order qty, I am selling few of them for Rs. 650 per board plus Rs.150 for shipping. The board will be without DRV8825 drivers and Arduino Mega2560 and users have to buy them separately. The board is designed to carry 2.5A current for stepper motors.
The price is kept very low because it is not for making profit but to make open source hardware popular and facilitate DIYers and hobbyists.

This work is licensed under a Creative Commons Attribution 3.0 Unported License.


Comments
Post a Comment